🚀 DataChain Open-Source Release. Star us on !
Kubernetes
To serve models in production in a scalable and failure-safe way, one needs something more than Heroku. Kubernetes is an open source container orchestration engine for automating deployment, scaling, and management of containerized applications.
Below, we will deploy a model to a kubernetes cluster exposing its prediction endpoints through a service.
Requirements
$ pip install mlem[kubernetes]
# or
$ pip install kubernetes docker
Prerequisites
In order to deploy your model-server on a K8s cluster, you must first have a ready setup. Namely:
- Make sure you have a Kubernetes cluster properly set up and accessible, with the corresponding kubeconfig file available. It doesn't matter which flavour - vanilla, GKE, EKS, AKS, Openshift, etc. If you're using multiple kubeconfig or a non-default kubeconfig location, check out the section below.
- Your local machine and the target cluster both have access to a docker registry. MLEM will build and push the image from your executor machine, and the k8s cluster will need to have access and permissions to pull those images.
- Relevant permissions to create resources on the cluster — deployment, service, etc. are present.
- Nodes are accessible and reachable, with some external IP address (if you're using a NodePort service to expose your server, more details below).
As a quick sanity command - try runnign kubectl get pods to check your cluster
is reachable and kubeconfig configured correctly. See the
Kubernetes Basics to
learn more about the concepts above.
Description
Deploying to a Kubernetes cluster involves 2 main steps:
- Build the docker image and upload it to a registry.
- Create resources on the Kubernetes cluster — specifically, a
namespace, adeploymentand aservice.
Once this is done, one can use the usual workflow of
mlem deployment run to deploy on
Kubernetes.
Specifying a custom kubeconfig
MLEM tries to find the kubeconfig file from the environment variable
KUBECONFIG or the default location ~/.kube/config.
If you need to use another path, one can pass it with
--kube_config_file_path ...
You can use mlem deploy run kubernetes -h to list all the configurable
parameters.
Most of the configurable parameters in the list above come with sensible defaults. But at the least, one needs to follow the structure given below:
$ mlem deployment run kubernetes service_name \
    --model model \
    --service_type loadbalancer
💾 Saving deployment to service_name.mlem
⏳️ Loading model from model.mlem
🛠 Creating docker image ml
  🛠 Building MLEM wheel file...
  💼 Adding model files...
  🛠 Generating dockerfile...
  💼 Adding sources...
  💼 Generating requirements file...
  🛠 Building docker image ml:4ee45dc33804b58ee2c7f2f6be447cda...
  ✅  Built docker image ml:4ee45dc33804b58ee2c7f2f6be447cda
namespace created. status='{'conditions': None, 'phase': 'Active'}'
deployment created. status='{'available_replicas': None,
 'collision_count': None,
 'conditions': None,
 'observed_generation': None,
 'ready_replicas': None,
 'replicas': None,
 'unavailable_replicas': None,
 'updated_replicas': None}'
service created. status='{'conditions': None, 'load_balancer': {'ingress': None}}'
✅  Deployment ml is up in mlem namespace
where:
service_nameis a name of one's own choice, of which correspondingservice_name.mlemandservice_name.mlem.statefiles will be created.modeldenotes the path to model saved viamlem.service_typeis configurable and is passed asloadbalancer. The default value isnodeportif not passed.
Checking the docker images
One can check the docker image built via docker image ls which should give the
following output:
REPOSITORY   TAG                                IMAGE ID       CREATED         SIZE
ml           4ee45dc33804b58ee2c7f2f6be447cda   16cf3d92492f   3 minutes ago   778MB
...
Checking the kubernetes resources
Pods created can be checked via kubectl get pods -A which should have a pod in
the mlem namespace present as shown below:
NAMESPACE     NAME                       READY   STATUS    RESTARTS       AGE
kube-system   coredns-6d4b75cb6d-xp68b   1/1     Running   7 (12m ago)    7d22h
...
kube-system   storage-provisioner        1/1     Running   59 (11m ago)   54d
mlem          ml-cddbcc89b-zkfhx         1/1     Running   0              5m58s
By default, all resources are created in the mlem namespace. This ofcourse is
configurable using --namespace prod where prod is the desired namespace
name.
Making predictions via MLEM
One can of course use the
mlem deployment apply command to
ping the deployed endpoint to get the predictions back. An example could be:
$ mlem deployment apply service_name data --json
[0, 0, 0, 0, 0, 0, 0, 0, 0, 0, 0, 0, 0, 0, 0, 0, 0, 0, 0, 0, 0, 0, 0, 0, 0, 0, 0, 0, 0, 0, 0, 0, 0, 0, 0, 0, 0, 0, 0, 0, 0, 0, 0, 0, 0, 0, 0, 0, 0, 0, 1, 1, 1, 1, 1, 1, 1, 1, 1, 1, 1, 1, 1, 1, 1, 1, 1, 1, 1, 1, 1, 1, 1, 1, 1, 1, 1, 1, 1, 1, 1, 1, 1, 1, 1, 1, 1, 1, 1, 1, 1, 1, 1, 1, 1, 1, 1, 1, 1, 1, 2, 2, 2, 2, 2, 2, 2, 2, 2, 2, 2, 2, 2, 2, 2, 2, 2, 2, 2, 2, 2, 2, 2, 2, 2, 2, 2, 2, 2, 2, 2, 2, 2, 2, 2, 2, 2, 2, 2, 2, 2, 2, 2, 2, 2, 2, 2, 2, 2, 2]
where data is the dataset saved via mlem.
Deleting the Kubernetes resources
A model can easily be undeployed using mlem deploy remove service_name which
will delete the pods, services and the namespace i.e. clear the resources
from the cluster. The docker image will still persist in the registry though.
Swapping the model in deployment
If you want to change the model that is currently under deployment, run
$ mlem deploy run --load service_name --model other-modelThis will build a new docker image corresponding to the other-model and will
terminate the existing pod and create a new one, thereby replacing it, without
downtime.
This can be seen below:
Checking the docker images
REPOSITORY   TAG                                IMAGE ID       CREATED             SIZE
ml           d57e4cacec82ebd72572d434ec148f1d   9bacd4cd9cc0   11 minutes ago      2.66GB
ml           4ee45dc33804b58ee2c7f2f6be447cda   26cb86b55bc4   About an hour ago   778MB
...
Notice how a new docker image with the tag d57e4cacec82ebd72572d434ec148f1d is
built.
Checking the deployment process
⏳️ Loading model from other-model.mlem
⏳️ Loading deployment from service_name.mlem
🛠 Creating docker image ml
  🛠 Building MLEM wheel file...
  💼 Adding model files...
  🛠 Generating dockerfile...
  💼 Adding sources...
  💼 Generating requirements file...
  🛠 Building docker ml:d57e4cacec82ebd72572d434ec148f1d...
  ✅  Built docker image ml:d57e4cacec82ebd72572d434ec148f1d
✅  Deployment ml is up in mlem namespace
Here, an existing deployment i.e. service_name is used but with a newer model.
Hence, details of registry need not be passed again. The contents of
service_name can be checked by inspecting the service_name.mlem file.
Checking the kubernetes resources
We can see the existing pod being terminated and the new one running in its place below:
NAMESPACE     NAME                  READY   STATUS        RESTARTS   AGE
kube-system   aws-node-pr8cn        1/1     Running       0          90m
...
kube-system   kube-proxy-dfxsv      1/1     Running       0          90m
mlem          ml-66b9588df5-wmc2v   1/1     Running       0          99s
mlem          ml-cddbcc89b-zkfhx    1/1     Terminating   0          60m
Example: Using EKS cluster with ECR on AWS
The deployment to a cloud managed kubernetes cluster such as EKS is simple and analogous to how it is done in the steps above for a local cluster (such as minikube).
The popular docker registry choice to be used with EKS is ECR (Elastic Container Registry). Make sure the EKS cluster has at least read access to ECR.
ECR
Make sure you have a repository in ECR where docker images can be uploaded. In
the sample screenshot below, there exists a classifier repository:
Using MLEM with ECR and EKS
Provided that the default kubeconfig file (present at ~/.kube/config) can
communicate with EKS, execute the following command:
$ mlem deploy run kubernetes service_name \
    --model model \
    --registry ecr \
    --registry.account 342840881361 \
    --registry.region "us-east-1" \
    --registry.host "342840881361.dkr.ecr.us-east-1.amazonaws.com/classifier" \
    --image_name classifier --service_type loadbalancer
💾 Saving deployment to service_name.mlem
⏳️ Loading model from model.mlem
🛠 Creating docker image classifier
  🛠 Building MLEM wheel file...
  💼 Adding model files...
  🛠 Generating dockerfile...
  💼 Adding sources...
  💼 Generating requirements file...
  🛠 Building docker image 342840881361.dkr.ecr.us-east-1.amazonaws.com/classifier:4ee45dc33804b58ee2c7f2f6be447cda...
  🗝 Logged in to remote registry at host 342840881361.dkr.ecr.us-east-1.amazonaws.com
  ✅  Built docker image 342840881361.dkr.ecr.us-east-1.amazonaws.com/classifier:4ee45dc33804b58ee2c7f2f6be447cda
  🔼 Pushing image 342840881361.dkr.ecr.us-east-1.amazonaws.com/classifier:4ee45dc33804b58ee2c7f2f6be447cda to
342840881361.dkr.ecr.us-east-1.amazonaws.com
  ✅  Pushed image 342840881361.dkr.ecr.us-east-1.amazonaws.com/classifier:4ee45dc33804b58ee2c7f2f6be447cda to
342840881361.dkr.ecr.us-east-1.amazonaws.com
namespace created. status='{'conditions': None, 'phase': 'Active'}'
deployment created. status='{'available_replicas': None,
 'collision_count': None,
 'conditions': None,
 'observed_generation': None,
 'ready_replicas': None,
 'replicas': None,
 'unavailable_replicas': None,
 'updated_replicas': None}'
service created. status='{'conditions': None, 'load_balancer': {'ingress': None}}'
✅ Deployment classifier is up in mlem namespace- Note that the repository name in ECR i.e.
classifierhas to match with theimage_namesupplied through--image_name
Checking the docker images
One can check the docker image built via docker image ls which should give the
following output:
REPOSITORY                                                TAG                                IMAGE ID       CREATED         SIZE
342840881361.dkr.ecr.us-east-1.amazonaws.com/classifier   4ee45dc33804b58ee2c7f2f6be447cda   96afb03ad6f5   2 minutes ago   778MB
...
This can also be verified in ECR:
Checking the kubernetes resources
Pods created can be checked via kubectl get pods -A which should have a pod in
the mlem namespace present as shown below:
NAMESPACE     NAME                          READY   STATUS    RESTARTS   AGE
kube-system   aws-node-pr8cn                1/1     Running   0          11m
...
kube-system   kube-proxy-dfxsv              1/1     Running   0          11m
mlem          classifier-687655f977-h7wsl   1/1     Running   0          83s
Services created can be checked via kubectl get svc -A which should look like
the following:
NAMESPACE     NAME         TYPE           CLUSTER-IP     EXTERNAL-IP                                                               PORT(S)          AGE
default       kubernetes   ClusterIP      10.100.0.1     <none>                                                                    443/TCP          20m
kube-system   kube-dns     ClusterIP      10.100.0.10    <none>                                                                    53/UDP,53/TCP    20m
mlem          classifier   LoadBalancer   10.100.87.16   a069daf48f9f244338a4bf5c60c6b823-1734837081.us-east-1.elb.amazonaws.com   8080:32067/TCP   2m32s
Making predictions via mlem or otherwise
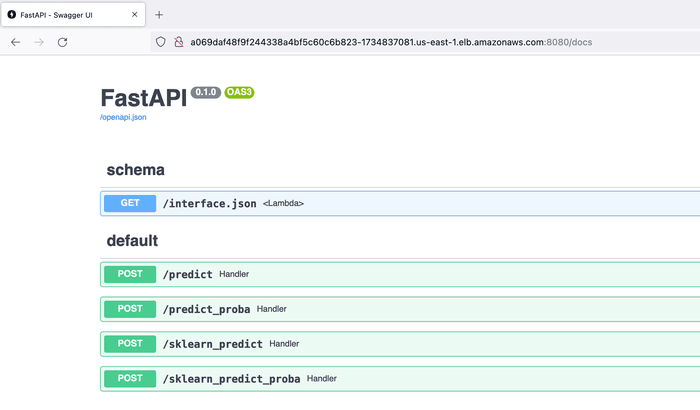
One can clearly visit the External IP of the service classifier created by
mlem i.e.
a069daf48f9f244338a4bf5c60c6b823-1734837081.us-east-1.elb.amazonaws.com:8080
using the browser and see the usual FastAPI docs page:
But one can also use the
mlem deployment apply command to
ping the deployed endpoint to get the predictions back. An example could be:
$ mlem deployment apply service_name data --json
[0, 0, 0, 0, 0, 0, 0, 0, 0, 0, 0, 0, 0, 0, 0, 0, 0, 0, 0, 0, 0, 0, 0, 0, 0, 0, 0, 0, 0, 0, 0, 0, 0, 0, 0, 0, 0, 0, 0, 0, 0, 0, 0, 0, 0, 0, 0, 0, 0, 0, 1, 1, 1, 1, 1, 1, 1, 1, 1, 1, 1, 1, 1, 1, 1, 1, 1, 1, 1, 1, 1, 1, 1, 1, 1, 1, 1, 1, 1, 1, 1, 1, 1, 1, 1, 1, 1, 1, 1, 1, 1, 1, 1, 1, 1, 1, 1, 1, 1, 1, 2, 2, 2, 2, 2, 2, 2, 2, 2, 2, 2, 2, 2, 2, 2, 2, 2, 2, 2, 2, 2, 2, 2, 2, 2, 2, 2, 2, 2, 2, 2, 2, 2, 2, 2, 2, 2, 2, 2, 2, 2, 2, 2, 2, 2, 2, 2, 2, 2, 2]
i.e. mlem knows how to calculate the externally reachable endpoint given the
service type.
A note about NodePort Service
While the example discussed above deploys a LoadBalancer Service Type, but one
can also use NodePort (which is the default) OR via --service_type nodeport
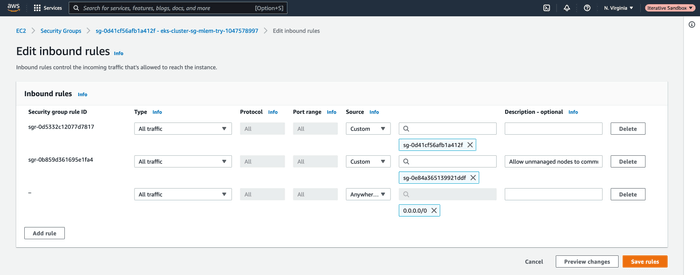
While mlem knows how to calculate externally reachable IP address, make sure
the EC2 machine running the pod has external traffic allowed to it. This can be
configured in the inbound rules of the node's security group.
This can be seen as the last rule being added below:


